Tuesday, 22 January 2013

It's Sale-A-Bration time!!

Today's the day! Sale-A-Bration 2013 has officially started!

Here's another sneaky peak of a card you can create using the SAB goodies you can earn yourself with just a £45 spend...


To create this card, I used the Sycamore Street DSP and Ribbon and Button Pack and Vine Street Embossing Folder, all from the SAB 2013 promotion...

I also used:

Subtles Collection card stock
Mini Brads
Mixed Bunch Punch 

Monday, 21 January 2013

Bright Butterflies...

A simple, girly card in pinks. Perfect for my sister's birthday, which will be with me before I know it!

I love cards like this because I can whip them up quickly, yet they look like a lot of time and effort has been put into them. Best of all, it only requires an embossing folder and a trimmer!


To make this card, I used:

Bigz Beautiful Butterflies Die
Print Poetry DSP
Subtles collection cardstock
Spots embossing folder

Sale-A-Bration Preview...

This card is a little taster of what's to come...

It showcases 2 of the 17 products available to you in SAB 2013. The first is a stamp from the Vintage Verses stamp set, the second is the Sycamore Street DSP.


I also used:

Honeycomb embossing folder
Floral Frames Framelits
Everyday Enchantment Brads
Perfect Plum stampin' pad
Perfect Plum card stock
Baja Breeze card stock

Spring Summer Sneaky Peak

Here's another sneaky peak of some of the new products available in the Spring Summer 2013 catalogue...


To make this card, I used:

Pool party and Rose Red Stampin' Pads
Pool Party Core'dinations
More Amore DSP *
Hearts a Flutter Dies and Stamps (as a bundle)*
Delightful Dozen Stamps
Pool Party Ruffled Ribbon
Honeycomb Embossing Folder *

* Spring Summer 2013 Products

Sale-A-Bration

It's here... Sale-A-Bration 2013 is about to begin!

So, what is it?

It's a chance for you to earn yourself free and exclusive products, only available from 22nd January- 22nd March.

How do you earn them?

It's easy, just spend £45, and earn a free product of your choice from the Sale-A-Bration brochure (to get a copy, contact me). If you fancy matching punches and stamps, problem solved, you can spend £90 and get 2 free products. You can't really go wrong!

Becoming a Demo...

What a great time to become a demo too... Not only do you receive great benefits like getting your hands on goodies before they're available to customers, but you can also spend just £99 and you get an additional 25% worth of products in your starter kit. That means you not only get all of your demo kit such as catalogues and leaflets, you can also order £162.50 worth of Stampin' Up! products. 

If you have any questions about signing up as a demo, or about placing an order, send me a quick email

Thank you to my neighbour...

My poor neighbour seems to do very little aside from take in my Stampin' Up! orders when they are delivered by UPS, so I wanted to send her a little card and a box of chocolates to thank her.

It was a quick and simple, but nice and bright to make up for the dull skies we've suffered recently.

The DSP used in this card is available from the 22nd January as part of the 2013 Sale-A-Bration promotion. Click here for more information...


To make this card, I used:

Calypso Coral and Pool Party Stampin' Pads
Pool Party Core'dinations
Sycamore Street DSP
Everyday Enchantment Brads
Everyday Enchantment Calypso CoralOrganza Ribbon
Mixed Bunch Punch & Stamp Set

Sunday, 20 January 2013

Triple Layer Birthday Card

Continuing with the cloud theme, I've made another card with a plane, but this time it's a landscape one...


To make this card, I used:

Whisper white card stock
Baja Breeze card stock
Pool Party Stampin' Pad
Basic Gray Stampin' Pad
Plane and Simple Stamps

Triple Layer Tutorial

Here's another tutorial for you... Can you tell I can't get out because of the snow?!

This is just a quick run through on how to produce a triple layer card with the cloud background that can be found in amongst my tutorials section.

First, you'll need to cut 6 pieces of cardstock to size...

My sizes are all for a 5X7 card.


My white cardstock is cut so that;

The largest piece is 4 1/2" by 6 1/2"
The middle piece is 3 1/2" by 5 1/2"
The smallest piece is 2 1/2" by 4 1/2"


Then, the layering cardstock is cut 1/4 of an inch bigger so that;

The largest piece is 4 3/4" by 6 3/4"
The middle piece is 3 3/4" by 5 3/4"
The smallest piece is 2 3/4" by 4 3/4"

Now, you just need the white cardstock...

You will need to layer them equally, making sure that the space around each edge is equal. They will need to be fixed, but not permanently at this stage. I tend to use some of my tape runner, just a strip in the middle on the back, which I them press the palm of my hand over a few times. This helps remove most of the adhesive, meaning that the layers can be repositioned and removed.


Then, stamp your images, or create your cloud background.


Now, you can separate your 3 layers again.

Following this, you can permanently adhere your layers together. Do this by firstly layering each white layer onto its coloured cardstock using a tape runner. After that, you can fix each layer together, until all 3 look like this:


Cloud Tutorial

A few people have asked how I created the cloud effect in my Dad's birthday card, so I thought I'd whizz through a quick tutorial...

Firstly, the things you need:

Use a piece of scrap card as blotting paper, a piece of dish sponge cut down to a manageable size and Pool Party Stampin' Pad.


To create the fluffy outlines, use 2 scallop circles or ovals glue together. Mine were punched from the 2 3/8 Stampin' Up! punch, then glued together with the Stampin' Up! liquid glue like this:


Firstly, place the template onto your backing card at an angle


Then, using the sponge, and onto your desired size of backing card, I dab the sponge into the stampin' pad, blot off the excess a couple of times on the template or blotting card, then stamp lightly around the edge of the template. Hold onto the template so that it doesn't slide:


Be careful to use a small surface area (I tend to wrap the sponge around my index finger and just used the end of my finger) and brush from on top of your template, pushing slightly away from the edges.


You're aiming for an effect like this:


Then, varying the angles, length and position of the template, continue like this:


At the end, I tend to turn my card 180 degrees and use my template on the bottom space to add the fluffy edges to the bottom. The end result will look something like this:


Saturday, 19 January 2013

And another 'Dad Card'

Well it looks like my lovely Dad will be in hospital for his birthday later this week, so I wanted to make him a card to help cheer him up.

What better way than to use his favourite colour and his background (RAF).

I'm hoping, when I pop in on his birthday, this will really make him smile!


To make this card, I used:

Pool Party Stampin' Pad
Baja Breeze Stampin' Pad
Baja Breeze Cardstock
Whisper White Cardstock
Sassy Salutations Happy Birthday Stamp
Need for Speed Aeroplane Stamp
Scallop Circle Punch (for the cloud template)

Friday, 18 January 2013

Get well soon Dad...

So, my Dad was taken to hospital this evening. Fortunately it's nothing major, but he's being kept in for tests etc. and will probably be in all weekend.

I know how dreary hospitals are (lots of past experience on a personal level), so I thought I'd make him a simple card in his favourite colours to brighten up his bedside...


To make this card, I used:

Print Poetry DSP
Marina Mist Cardstock
Basic Gray Ink
Sassy Salutations Feel Better Stamp
Framelits Dies
Paper Piercing Tool
Paper Piercing Mat
Paper Piercing Templates

Tuesday, 15 January 2013

What better time to start your collection?


So, it's 25 years since Stampin' Up! was launched meaning that there are lots of exciting goodies and promotions in store for us, AND, it's sale-a-bration time.

You've got 2 options here... you could choose to buy £45 of products, and get a free item from the SAB catalogue (if you'd like one, just email me!), or you can sign up as a demonstrator, and can order £162.50 of products for just £99- that's 25% more than normal!

If you have any questions, please don't hesitate to contact me...

Saturday, 12 January 2013

And another...

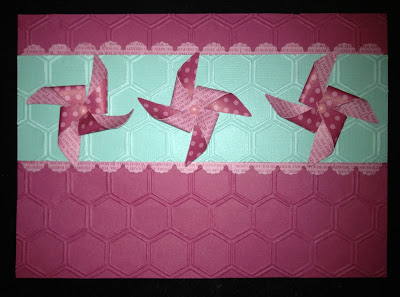
In between a trip to the cinema, I've created another bright and cheerful card using the new Sizzix pinwheel die.


To create this card, I used:

Lucky limeade and Raspberry Ripple cardstock
Sizzix pinwheel die
Mini brads
Subtles Collection DSP
Itty Bitty Banners Stamp
Lucky Limeade Ink Pad
Modern Label Punch

Another sneaky peak...

Here's another card, which was a little more time consuming because I had to cut all of the internals from the honeycomb embossing folder (which is fast becoming my favourite folder ever!). But I love the effect, and think it's well worth it!


To create this card, I used:
Lucky limeade cardstock
Raspberry ripple cardstock
Subtles collection DSP
Print poetry dsp
Mini brads
Lucky limeade ink
Everyday enchantment lucky limeade ribbon
Itty Bitty Banners Stamp

Friday, 11 January 2013

The Birthday Cards Begin...

So, Christmas has come and gone, and I'm now starting to think about getting the birthday cards I need for the year organised.

I've got my hands on some of the gorgeous products from the Spring/Summer catalogue, and I've used them to help make this bright and cheerful card...


To create this card, I used:
Pinwheel sizzix die
Honeycomb embossing folder
Pool Party core'dinations cardstock
Stampin' Sanding System